特别声明:本文未经许可禁止转载
开头
VS Code是微软在Electron的基础上使用TypeScript开发的- 本文是基于VS Code 1.36.0版本的基础上分析的
- 本文重点解析VS Code工程中,我认为值得学习的地方
- 如有问题,可以留言
Chromium
要讲Electron,必须先说Chromium。Chromium使用了多进程架构,分为Browser Process和Render Process,Render Process使用Blink和V8,Blink用于计算布局,V8用于运行JavaScript代码,真正渲染到屏幕上一个一个的像素,是在Browser Process完成的,Browser Process和Render Process通过IPC进程通信(使用Mojo),Browser Process可以保证安全(用于渲染到屏幕,管理Cookie、Storage、网络请求等),而Render Process是在沙箱里面运行的。
Electron
Electron在Chromuim基础上,给Browser Process和Render Process都加进了Node Environment,这样,带来了Node开发者,带来了丰富的NPM包,并且,不论是在Browser Process还是Render Process,都能直接调用Node API,从而获得Native能力。同时,Electron还给Browser Process和Render Process加进了Electron API,为开发者提供Browser Process和Render Process的IPC通信API,以及提供一些必要的功能。
以下用主进程表示Browser Process,用渲染进程表示Render Process
为方便后文理解,先讲一下VS Code初始化过程
为方便起见,文件名不加后缀,比如
src/main实际为src/main.js,而src/vs/code/electron-main/main实际为src/vs/code/electron-main/main.ts
- Electron根据根目录下package.json文件中的main字段,在主进程加载
src/main,处理本地语言配置以及process.env - 加载
src/vs/code/electron-main/main,实例化CodeMain类,调用该类中的main()方法,创建主进程中外层的InstantiationService,并实例化CodeApplication类,调用该类中的startup()方法InstantiationService用于实例化其他类,使得其他类在主进程或者渲染进程中,在保持单例的同时又能很方便的作为构造器参数传入,这个类是VS Code工程中实现依赖注入的重要部分 - 在
CodeApplication类的startup()方法中,再次创建InstantiationService,该InstantiationService是外层InstantiationService的child,并且如果某个类的实例在当前窗口的InstantiationService中找不到时,会去外层的InstantiationService中查找,然后实例化各个Service类,并最终在src/vs/code/electron-main/window中调用new BrowserWindow(options),打开窗口,携带处理完毕的配置参数加载渲染进程的代码src/vs/code/electron-browser/workbench/workbench - 加载
src/vs/workbench/electron-browser/main,实例化渲染进程各个Service类放入serviceCollection,然后用serviceCollection去实例化渲染进程的InstantiationService - 加载后续代码,用TypeScript操作DOM,计算Layout,生成页面
用Service划分各个功能的界线
VS Code中有许多Service,有的位于主进程,有的位于渲染进程,有的只在主进程使用,有的只在渲染进程使用,有的在主进程中定义逻辑,在渲染进程中通过Electron提供的IPC建立Proxy使用(对于Service使用者来说无感知),Service位于src/vs/platform目录,主要有IInstantiationService,IEnvironmentService,IFileService,ILayoutService,INotificationService,IOpenerService,IStorageService,IWindowsService,IWindowsMainService,IWorkspacesService,IWorkspacesMainService等
依赖注入Dependency Injection
关于依赖注入的整体介绍,VS Code wiki已经讲的很清楚了:
The code is organized around services of which most are defined in the
platformlayer. Services get to its clients viaconstructor injection.
A service definition is two parts: (1) the interface of a service, and (2) a service identifier - the latter is required because TypeScript doesn’t use nominal but structural typing. A service identifier is a decoration (as proposed for ES7) and should have the same name as the service interface.
Declaring a service dependency happens by adding a corresponding decoration to a constructor argument. In the snippet below@IModelServiceis the service identifier decoration andIModelServiceis the (optional) type annotation for this argument. When a dependency is optional, use the@optionaldecoration otherwise the instantiation service throws an error.
1 | class Client { |
Use the instantiation service to create instances for service consumers, like so
instantiationService.createInstance(Client). Usually, this is done for you when being registered as a contribution, like a Viewlet or Language.
下面从代码角度说明一下:
- 使用
decoration(注解)将依赖以变量的形式存到Class上1
2
3
4
5
6
7
8
9
10
11
12
13
14
15
16
17
18
19
20
21
22
23
24
25
26
27
28
29// src/vs/platform/instantiation/common/instantiation.ts
export function createDecorator<T>(serviceId: string): ServiceIdentifier<T> {
if (_util.serviceIds.has(serviceId)) {
return _util.serviceIds.get(serviceId)!;
}
//根据TypeScript的规定,实现注解函数
const id = <any>function (target: Function, key: string, index: number): any {
if (arguments.length !== 3) {
throw new Error('@IServiceName-decorator can only be used to decorate a parameter');
}
storeServiceDependency(id, target, index, false);
};
id.toString = () => serviceId;
_util.serviceIds.set(serviceId, id);
return id;
}
function storeServiceDependency(id: Function, target: Function, index: number, optional: boolean): void {
// 在运行时,将注解保存到target(Class),方便之后计算graph
if (target[_util.DI_TARGET] === target) {
target[_util.DI_DEPENDENCIES].push({ id, index, optional });
} else {
target[_util.DI_DEPENDENCIES] = [{ id, index, optional }];
target[_util.DI_TARGET] = target;
}
} - 根据已有信息计算依赖,构造有向图
- 找出出度为0的节点,并从这些节点开始,用
instantiationService.createInstance(Client)初始化实例graph LR; Class-A-->Dependence-Class-B; Dependence-Class-B-->Dependence-Class-C; Class-A-->Dependence-Class-D; Dependence-Class-D-->Dependence-Class-E; Dependence-Class-D-->Dependence-Class-F;
其中,Class-A为当前需要实例化的类,graph生成完毕之后,根据规则,先实例化Dependence-Class-C、Dependence-Class-E、Dependence-Class-F,再实例化Dependence-Class-B、Dependence-Class-D,最后才实例化Class-A
1
2
3
4
5
6
7
8
9
10
11
12
13
14
15
16
17
18
19
20
21
22
23
24
25
26
27
28
29
30
31
32
33
34
35
36
37
38
39
40
41
42
43
44
45
46
47
48
49
50
51
52
53
54
55
56
57
58
59
60
61
62
63
64
65// src/vs/platform/instantiation/common/instantiationService.ts
private _createAndCacheServiceInstance<T>(id: ServiceIdentifier<T>, desc: SyncDescriptor<T>, _trace: Trace): T {
type Triple = { id: ServiceIdentifier<any>, desc: SyncDescriptor<any>, _trace: Trace };
// 有向图,保存出度和入度
const graph = new Graph<Triple>(data => data.id.toString());
function throwCycleError() {
const err = new Error('[createInstance] cyclic dependency between services');
err.message = graph.toString();
throw err;
}
let count = 0;
const stack = [{ id, desc, _trace }];
while (stack.length) {
const item = stack.pop()!;
graph.lookupOrInsertNode(item);
// TODO@joh use the graph to find a cycle
// a weak heuristic for cycle checks
if (count++ > 100) {
throwCycleError();
}
// check all dependencies for existence and if they need to be created first
let dependencies = _util.getServiceDependencies(item.desc.ctor);
for (let dependency of dependencies) {
let instanceOrDesc = this._getServiceInstanceOrDescriptor(dependency.id);
if (!instanceOrDesc && !dependency.optional) {
console.warn(`[createInstance] ${id} depends on ${dependency.id} which is NOT registered.`);
}
if (instanceOrDesc instanceof SyncDescriptor) {
const d = { id: dependency.id, desc: instanceOrDesc, _trace: item._trace.branch(dependency.id, true) };
// 从item节点指向d节点
graph.insertEdge(item, d);
stack.push(d);
}
}
}
while (true) {
// 找出出度为0的节点
let roots = graph.roots();
// if there is no more roots but still
// nodes in the graph we have a cycle
if (roots.length === 0) {
if (!graph.isEmpty()) {
throwCycleError();
}
break;
}
for (let { data } of roots) {
// create instance and overwrite the service collections
const instance = this._createServiceInstanceWithOwner(data.id, data.desc.ctor, data.desc.staticArguments, data.desc.supportsDelayedInstantiation, data._trace);
this._setServiceInstance(data.id, instance);
graph.removeNode(data);
}
}
return <T>this._getServiceInstanceOrDescriptor(id);
} - 值得说明的是,实例化是支持懒加载的,懒加载使用代理模式,懒加载的实现原理如下:
1
2
3
4
5
6
7
8
9
10
11
12
13
14
15
16
17
18
19
20
21
private _createServiceInstance<T>(ctor: any, args: any[] = [], _supportsDelayedInstantiation: boolean, _trace: Trace): T {
if (!_supportsDelayedInstantiation || !_canUseProxy) {
// eager instantiation or no support JS proxies (e.g. IE11)
return this._createInstance(ctor, args, _trace);
} else {
// Return a proxy object that's backed by an idle value. That
// strategy is to instantiate services in our idle time or when actually
// needed but not when injected into a consumer
const idle = new IdleValue(() => this._createInstance<T>(ctor, args, _trace));
return <T>new Proxy(Object.create(null), {
get(_target: T, prop: PropertyKey): any {
return idle.getValue()[prop];
},
set(_target: T, p: PropertyKey, value: any): boolean {
idle.getValue()[p] = value;
return true;
}
});
}
}
Part
打开VS Code并新建一个窗口(默认配置下),可以将窗口分成几大部分:
- TitleBarPart,位于顶部
- ActivityBarPart,位于最左侧,大部分由Icon构成
- SideBarPart,紧贴ActiviyBarPart右侧
- EditorPart,编辑器
- PanelPart,位于编辑器下面,由Terminal等构成
- StatusBarPart,位于最下面,显示状态、分支等
可见,VS Code视图由Part构成。Part是VS Code工程中的一个基础类,定义了许多抽象方法,其中,protected createContentArea(parent: HTMLElement, options?: object): HTMLElement | null方法,使用TypeScript操作DOM来用来定义视图
Part之用TypeScript操作DOM
在src/vs/base/browser/ui目录下,定义了许多基础的组件,比如SelectBox,用dom.append(container, $('.option-text'));形式和CSS,定义界面。
Command机制
Command可以说是VS Code定义的另一个非常好用的概念。他可以让用户通过Shift+Command+P选择Command然后执行,并且赋予了VS Code Extension扩展Command的能力。Command支持插件进程和VS Code进程相互调用。
Extension(插件)机制
软件开发中的开闭原则:开放扩展,关闭修改。Extension便是开闭原则的一个很好的实现。Chrome有插件,Cocos有插件,Hexo有插件,Webpack有插件,Gulp有插件,VS Code也有插件
VS Code内置插件在extension目录下,内置插件分成两种,一种是本地内置插件,另一种是打包是从Extension Markets下载的内置插件,插件开发文档点这。从插件大类来看,也可以分成两种,一种是Normal Extension,可以使用VS Code API,另一种是Debugger Extension,用于运行Debug Adapter。
Gulp编译打包
Gulp官方介绍如下:
- Automation - gulp is a toolkit that helps you automate painful or time-consuming tasks in your development workflow.
- Platform-agnostic - Integrations are built into all major IDEs and people are using gulp with PHP, .NET, Node.js, Java, and other platforms.
- Strong Ecosystem - Use npm modules to do anything you want + over 2000 curated plugins for streaming file transformations
- Simple - By providing only a minimal API surface, gulp is easy to learn and simple to use
VS Code打包脚本位于build目录下,在执行gulp watch之后,gulp会首先加载根目录的gulpfile.js文件,进而加载build目录下一系列gulp.*.js文件,build/gulp.*.js文件中定义了许多gulp task,各个task可以相互依赖。如果想运行VS Code,可以参考[官方文档](https://github.com/microsoft/VS Code/wiki/How-to-Contribute)。
VS Code调试架构
VS Code可以调试javascript、python、php、c各种语言,而实现这些调试等基础就是DAP协议,官方对DAP的图示如下:
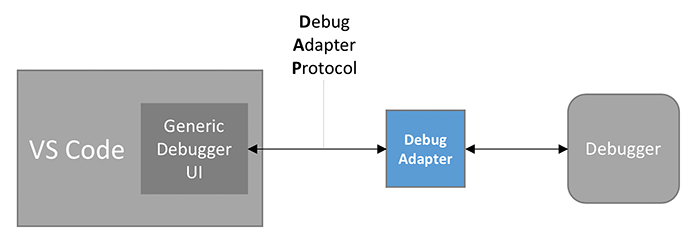
VS Code 定义了一种抽象的协议即DAP,并实现了一种通用的调试UI,VS Code使用该协议与各种语言的调试进程通信,但是,各种语言不会实现DAP协议,因此,需要一个Adapter,即Debug Adapter(DA),DA运行在一个单独的进程里面,与调试进程通信。
如果你想调试某种语言,首先,需要先实现该语言的Debug Adapter并以Debugger Extension的形式,安装到VS Code上,关于如何实现,你可以查看官方文档。当然,大部分语言的Debug Adapter都已经被实现,你可以直接使用。
引用
https://en.wikipedia.org/wiki/Open%E2%80%93closed_principle
https://www.typescriptlang.org/docs/handbook/decorators.html
https://github.com/microsoft/vscode/wiki/Source-Code-Organization
https://developer.mozilla.org/zh-CN/docs/Web/JavaScript/Reference/Global_Objects/Proxy
https://code.visualstudio.com/api/extension-guides/debugger-extension